这篇文章来源于DevicePlus.com英语网站的翻译稿。
目录
1. 简介
1.1 认识DHT22:一种温湿度传感器
1.2 您将要学到的内容
2. 将您的Raspberry Pi与DHT22传感器连接
2.1 DHT22:基本电路
2.1.1 BOM
2.1.2 启动!
2.2 DHT22机房环境控制器
2.2.1 BOM
2.2.2 启动!

exentia – stock.adobe.com
1. 简介
能够在任意环境中轻松感知环境湿度的能力非常重要,因为湿度不仅会影响人的舒适度,还会影响人类机体的运作。我们在本文中将要使用的双模传感器非常适用于创客项目,例如改善HVAC、气象站和物联网恒温器,尤其是与仅在Raspbian上可用的大量高质量软件包相结合之后。您可以在Pi(或Linux终端)上试试这个:
wget \ http://archive.raspbian.org/raspbian/dists/stable/main/binary-armhf/Packages.xz \
-O - 2>/dev/null | xz -dfc | grep -c '^Package: ' \
| cut -d ' ' -f 2
等待其运行完成。它将输出您可以使用的软件包数量。在撰写本文时,该存储库中有61.487个包。这个数量每天都在增加。
无论您需要什么功能,应该都可以通过这些软件包来实现。您只需要提供感知的环境数据,本文第二部分中的示例将会告诉您如何获取这些数据。
相对湿度(RH)的概念在维基百科中有很详尽的解释。请记住,相对湿度和实际湿度是两种不同的东西,因为相对湿度取决于温度。
我们普遍感兴趣的是湿度对于人类和电子设备的阈值。如果您在25C/77F左右的环境温度下运动,那么会在35-40% RH开始感到不适。您的电子设备,尤其是计算机系统,在45-55% RH,温度在20C/68F至 24C/75F之间的环境中更灵敏,且性能最佳。如果RH太低,ESD就会成为问题。如果RH太高,有局部冷凝的风险。
在冷却理论中,有一个简单的事实经常被忽视,即水分子是完美的小热量桶,风冷系统在45-55% RH环境中的冷却效果会比在20% RH环境中好得多。湿度对此有所帮助。很多人没有发现这一点,而您现在已经获悉这个小技巧了。
了解了这些内容,现在我们继续讨论硬件部分。
1.1 认识DHT22:一种温湿度传感器
该使用什么硬件?当然,SHT85湿度传感器性能很好,防水等级为IP67,误差范围仅为±1.5% RH,但我想我们可以选择湿度传感器误差范围为±2-5% RH的设备。
DHT22有一个板载模数转换器,因此湿度传感器和热敏电阻的信号清晰明了。如果没有该功能,校验和的读取会让您十分痛苦。温度感应只有±0.5C的误差,对创客来说性能已经算非常好了。
五年前我买了6个,每个都性能出色,即使是在户外(虽然屏蔽了来自阳光、雨水等的紫外线)。DHT22是单总线,既不是I2C也不是SPI,虽然电压范围为3.3至6伏,但是绝不能用大于3.3V的电压供电,因为这会导致其发热,并感应出错误的温度数据。过高的局部温度会蒸发水分,因此局部湿度也会下降。这一点是完全可以避免的:直接从Raspberry Pi的3V3引脚获取3.3V电压,该引脚的数字为1。
在没有运行时的电流消耗非常低(约40uA),因此不需要任何节能功能,但如果您想要设置该功能,比如在MCU睡眠状态期间将DHT22关闭,那么在再次想要读取数据时,需要大概1秒钟的唤醒时间。当开始对周围环境进行测量时,DHT22消耗1.5-2.5mA的电流,因此电流量不会达到使用3V3引脚时建议的最大电流量50mA。
最小轮询间隔被定义为两秒,不过实际并不是如此。我可以以大约350毫秒的间隔进行轮询,大约10秒后会出现升温问题—但是如果您出于某种原因需要快速读取10次数据(取中位数?),那么在3.5秒内就可以完成,非常好。
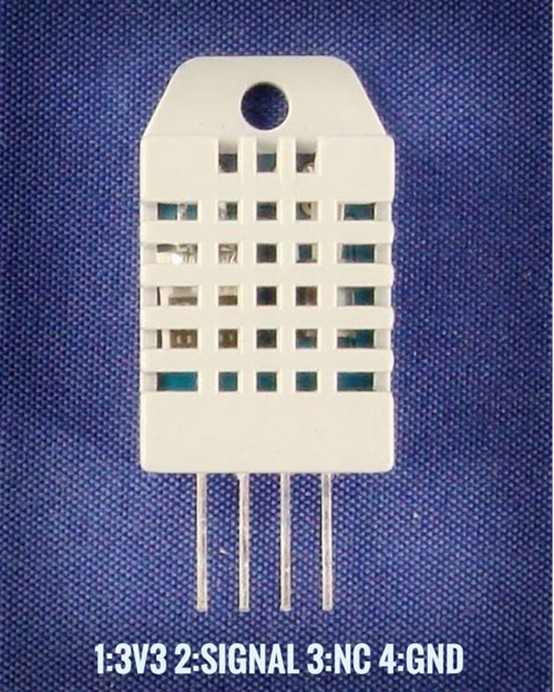
引脚从左到右分别是1:VCC(3V3),2:SIGNAL,3:NC(未连接),4:GND。您还需要一个从引脚2到引脚1的10kΩ上拉电阻。
当且仅当您遇到抖动(通常发生在长线缆电路上)状况时,需要在VCC和GND之间添加一个100nF电容。
1.2 您将要学到的内容
学习完本文内容后,您将能够轻松感知相对温度和湿度。我添加了一些辅助函数,使您无需谷歌工具就可以将完成“摄氏度”和“华氏度”之间的转换。每次都手动转换会比较麻烦。为了您的方便,我们添加两个小的辅助函数:
# Celsius to fahrenheit: F = ( C * 1.8 ) + 32
def celsius2fahrenheit( _celsius ):
  _fahrenheit = ( "%.2f" % (( _celsius * 1.8 ) + 32) )
  return float( _fahrenheit )

# Fahrenheit to celsius: C = ( F - 32 ) * 5/9
def fahrenheit2celsius( _fahrenheit ):
  _celsius = ( "%.2f" % (( _fahrenheit - 32 ) * 5/9 ))
  return float( _celsius )
在第二部分的dht22_simple.py和dht22_actionable.py中也有这两个函数。
在我们研究DHT22的过程中,将会深入探索“DHT22机房环境控制器”或DCREC的构建和操作,该器件能够对传感器数据进行响应。您可以将dht22_actionable.py作为湿度项目的模板(基于DHT22),如果您具备了硬件和安装技能,就可以完成几乎所有的工作了。阅读完python脚本后,您也将会掌握GPIO输出控制。
2. 将您的Raspberry Pi与DHT22传感器连接
DHT22非常易于使用。此处无需处理I2C总线,它是I/O的一个数据引脚,是一种半双工总线,也许您对这个术语更熟悉。
您可以从技术规格书 获取有关脉冲长度、间隔等信息,但如果您想马上开始,请首先按照此Raspberry Pi设置指南确保您的Pi已准备就绪。
准备好后,将下面的脚本复制粘贴到您的Raspberry Pi GUI编辑器中(听说Pluma很好用),并将文件保存为“rpi_prepare.sh”。
[ begin rpi_prepare.sh ]
#! /usr/bin/env bash
set -eu -o pipefail
DEBIAN_FRONTEND="noninteractive"
DEBIAN_PRIORITY="critical"
DEBCONF_NOWARNINGS="yes"
export DEBIAN_FRONTEND DEBIAN_PRIORITY DEBCONF_NOWARNINGS

_pkg_list="pigpio wiringpi python-rpi.gpio
python3-rpi.gpio rpi.gpio-common git python-gpiozero
python-gpiozero-doc python3-gpiozero python-setuptools-git python3-setuptools-git python3-dev python3-pip"

# Upgrade system and installed packages - uncomment where
# relevant
sudo apt update || ech o failed to update index list
#sudo dpkg --configure -a || ech o failed to fix interrupted \
upgrades
#sudo apt --fix-broken --fix-missing install || ech o failed \
to fix conflicts
#sudo apt -y --allow-downgrades --fix-broken --fix-missing \
#dist-upgrade

# Install $_pkg_list
sudo apt update
sudo apt-get -y install $_pkg_list

# Make 'pip3' bigly fresh? Yes.
sudo python3 -m pip --upgrade pip setuptools wheel
# Get Adafruit_DHT Python library
sudo pip3 install Adafruit_DHT

read -p "[?] Reboot? y/N: " _foo
if [ X"$_foo" = X"y" -o X"$_foo" = X"Y" ]
then
  ech o "[!] Rebooting in 5 seconds, CTRL+C to abort ..."
  for i in $( seq 1 5 ) ; do ech o -n . ; sleep 1 ; done ; ech o
  sudo reboot
fi
[ end rpi_prepare.sh ]
该脚本用于安装和更新Python3的“pip3”程序,以及安装一些有用的GPIO软件。将其复制到Pi后,使用以下命令运行:
bash rpi_prepare.sh
2.1.1 BOM
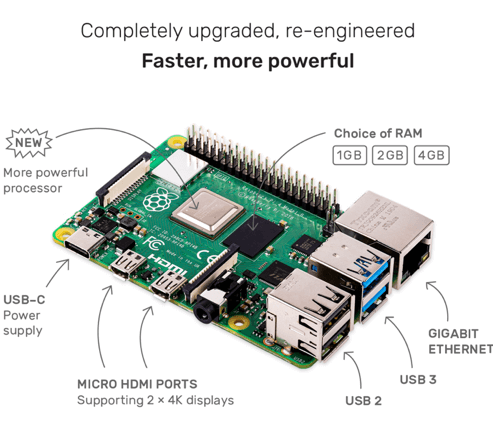
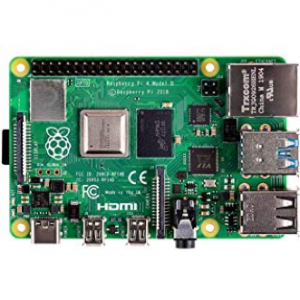
| Raspberry Pi 4 | https://www.newark.com/raspberry-pi/rpi4-modbp-4gb/raspberry-pi-4-model-b-4gb-rohs/dp/02AH3164 |
| DHT22 传感器 | https://www.newark.com/mcm/83-17985/dht22-temp-humidity-sensor/dp/32AC9951 |
| 10kΩ 电阻 | https://www.newark.com/multicomp-pro/mccfr0w4j0103a50/carbon-film-resistor-10kohm-250mw/dp/58K5002 |
| 杜邦电线 | https://www.newark.com/adafruit/824/wire-gauge-28awg/dp/88W2794 |
| 面包板 | https://www.newark.com/mcm/21-19082/breadboardjumper-kit-with-binding/dp/79X3995 |
2.1.2 启动!
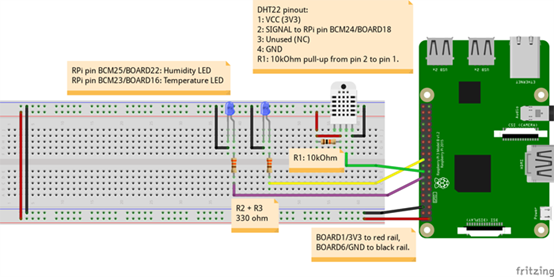
将它们全部连接起来,这一步很简单,请按照以下图示进行连接。
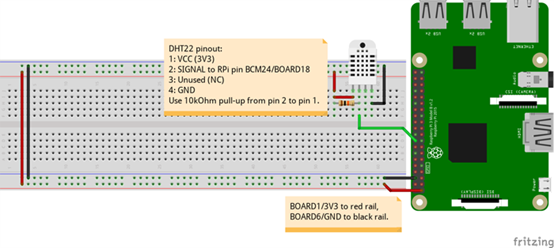
首先,将DHT22放在面包板上,并在引脚1和引脚2之间添加10kΩ上拉电阻。然后将BOARD1/3V3连接到面包板上的红色导轨,BOARD6/GND连接到黑色导轨,将BCM24/BOARD18连接到DHT22上的引脚2。现在,用一根导线从红色导轨连接到DHT22的引脚1,用另一根导线从黑色导轨连接到引脚4。然后将以下脚本复制粘贴到您的Pi终端:
#! /usr/bin/env python3
# Demonstrate reading DHT22 sensor using the
# Adafruit_DHT library
# DHT22 pinout (left to right):
# 1: VCC(3.3-6V)
# 2: SIGNAL
# 3: UNUSED
# 4: GND
# Notes:
# - 10kOhm pull-up resistor from SIG to VCC.
# - Use 3V3 for VCC, or the DHT22 will heat up.
# - Indentation: 2 whitespaces per level, no tabs.
import Adafruit_DHT
from time import sleep
p=print # Alias
# Note: Use >=2000ms polling intervals
_poll_interval = 2 # Seconds
_dht_pin = 24 # BCM24/BOARD18
_dht = Adafruit_DHT.DHT22

def celsius2fahrenheit( _celsius ):
  _fahrenheit = ( "%.1f" % (( _celsius * 1.8 ) + 32) )
  return float( _fahrenheit )

def fahrenheit2celsius( _fahrenheit ):
  _celsius = ( "%.1f" % (( _fahrenheit - 32 ) * 5/9 ))
  return float( _celsius )

if __name__ == '__main__':
  while True:
    ( _humidity, _celsius ) = Adafruit_DHT.read_retry( _dht, _dht_pin )
    p( "Humidity => %.1f%% RH" % _humidity )
    p( "Temperature => %.2fF" % celsius2fahrenheit( _celsius ), end='/' )
    p( "%.2fC" % _celsius )
    sleep( _poll_interval )
[ end dht22_simple.py ]
输出应如下所示。如果没有输出任何内容,您可能遇到了运行超时的问题。这种情况有时候会发生,但是是不应该会发生的。按下CTRL+C中断程序,并检查所有连接是否正确。
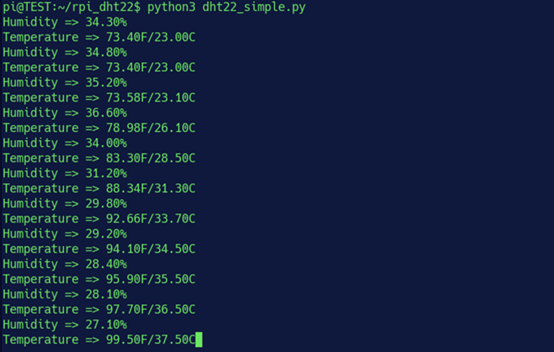
在截图的执行过程中,我将热风枪的喷嘴轻轻靠近DHT22,同时用红外温度计测量DHT22。这两个读数可以彼此验证,以保证实验的严谨性。
2.2 DHT22 机房控制器
现在,我们将做一些比仅仅通过湿度传感器和热敏电阻感知环境更有趣的事情—制作DHT22机房环境控制器。在阅读下面的dht22_actionable.py之前,需要对其操作进行简短的解释。我们设置两个Raspberry Pi GPIO引脚作为输出(BCM25/BOARD22和BCM23/BOARD16),建立与DHT22传感器的连接,然后我们循环几个条件语句来检查所处环境是否满足公认的“适于计算的最佳湿度和温度条件”。
每当湿度或温度超出范围时,_humidity_led或_temperature_led都会亮起。但它也可以用于驱动电路,例如IRLZ24N MOSFET或继电器驱动电路。您可以利用自己现有的设备来实现所有这些功能。
准备好所有的元器件,如果有缺少的东西,请访问下文BOM中的连接。
2.2.1 BOM
| Raspberry Pi 4 | https://www.newark.com/raspberry-pi/rpi4-modbp-4gb/raspberry-pi-4-model-b-4gb-rohs/dp/02AH3164 |
| DHT22 传感器 | https://www.newark.com/mcm/83-17985/dht22-temp-humidity-sensor/dp/32AC9951 |
| 2x ROHM SLR343BC4TT32 3mm LED | https://www.infinite-electronic.hk/product/LAPIS-Semiconductor_SLR343BC4TT32.aspx |
| 杜邦电线 | https://www.newark.com/adafruit/824/wire-gauge-28awg/dp/88W2794 |
| 面包板 | https://www.newark.com/mcm/21-19082/breadboardjumper-kit-with-binding/dp/79X3995 |
| 10kΩ 电阻 | https://www.newark.com/multicomp-pro/mccfr0w4j0103a50/carbon-film-resistor-10kohm-250mw/dp/58K5002 |
| 2x 330Ω 电阻 | https://www.newark.com/multicomp-pro/mccfr0w4j0331a50/carbon-film-resistor-330-ohm-250mw/dp/58K5042 |
2.2.2 启动!
如下图所示完成所有连接。保留上次Raspberry Pi GPIO BCM25/BOARD22和BCM23/BOARD16的引脚连接,3V3/BOARD1和GND/BOARD6的连接和上次相同。在您的Pi准备好运行程序之前不要给电路通电,在此之前仔细检查所有连接。确认没有任何问题后,通电并执行下文中的dht22_actionable.py。
python3 dht22_actionable.py
#! /usr/bin/env python3
# Install prerequisite packages & Adafruit_DHT library
"""
#! /bin/sh
_pkg_list='python3-setuptools python3-pip python3-dev python3-rpi.gpio'
sudo apt-get -y install $_pkg_list
sudo python3 -m pip --upgrade pip setuptools wheel
sudo pip3 install Adafruit_DHT
"""
#
# Ensure operating conditions in a
# datacenter (your basement) are
# within SAFE OPERATING HUMIDITY- AND
# TEMPERATURE THRESHOLDS FOR OPTIMAL
# COMPUTING CONDITIONS.
#
# Will fire BCM25/BOARD22 if humidity is
# out of bounds, and BCM23/BOARD16 if
# temperature is out of bounds.
#
# Uses RPi.GPIO Adafruit_DHT library,
# tested on Raspbian, Dec. 2019
#
# DHT22 pinout (left to right):
# 1: VCC(3.3-6V)
# 2: SIGNAL
# 3: UNUSED
# 4: GND
# Notes:
# - 10kOhm pull-up resistor from SIG to VCC.
# - 330ohm resistors in series with RPi
#   GPIO pins and ROHM SLR343BC4TT32
#   3mm LEDs.
# - Use 3V3 for VCC, or the DHT22 will
#   heat up.
# - Indentation: 2 whitespaces per level, no
#   tabs.
import Adafruit_DHT
from time import sleep
import RPi.GPIO as GPIO
import atexit
GPIO.setwarnings( True )
# Use BCM pin numbering instead of BOARD
GPIO.setmode( GPIO.BCM )
_humidity_led = 25 # BCM25/BOARD22
_humidity_lower_threshold = 45.0
_humidity_upper_threshold = 55.0
_temperature_led = 23 # BCM23/BOARD16
_temperature_lower_threshold = 20.0 # 20C/68F
_temperature_upper_threshold = 24.0 # 24C/75F
_poll_interval = 2 # Use intervals >=2secs
_dht_pin = 24 # BCM24/BOARD18
_dht = Adafruit_DHT.DHT22
_debug = True
p=print # Alias

if _debug:
  p( "[!] Setting up pin BCM_%i as OUTPUT for humidity LED ..." % _humidity_led )
  p( "[!] Setting up pin BCM_%i as OUTPUT for temperature LED ..." %  _temperature_led )

GPIO.setup( _humidity_led, GPIO.OUT )
GPIO.setup( _temperature_led, GPIO.OUT )

def exit_cleanly():
  print( "[!] Cleaning up and exiting ..." )
  GPIO.setwarnings( False )
  GPIO.cleanup()
  exit()

def celsius2fahrenheit( _celsius ):
  _fahrenheit = ( "%.1f" % (( _celsius * 1.8 ) + 32) )
  return float( _fahrenheit )

def fahrenheit2celsius( _fahrenheit ):
  _celsius = ( "%.1f" % (( _fahrenheit - 32 ) * 5/9 ))
  return float( _celsius )

# Call exit_cleanly on normal exit and CTRL+C/KeyboardInterrupt/foo
atexit.register( exit_cleanly )

if __name__ == '__main__':
  while True:
	( _humidity, _celsius ) = Adafruit_DHT.read_retry( _dht,
        _dht_pin )
	if _debug:
  	p( "[+] Humidity => %.1f%% RH" % _humidity )
  	p( "[+] Temperature => %.1fC" % _celsius, end='/' )
  	p( "%.1fF" % celsius2fahrenheit( _celsius ) )
	# Let's be neat
	_humidity = float( "%.1f" % _humidity )
	_celsius = float( "%.1f" % _celsius )
	# Humidity too high?
	if _humidity > _humidity_upper_threshold:
  	p(
        "[!] Humidity %.1f%% RH exceeds upper threshold value of %.1f%% RH" %
        ( _humidity, _humidity_upper_threshold ) )
  	# Take decisive action!
  	GPIO.output( _humidity_led, 1 )
	# Humidity too low?
	elif _humidity < _humidity_lower_threshold:
  	p(
        "[!] Humidity %.1f%% RH is below lower threshold value of %.1f%% RH" %
         ( _humidity, _humidity_lower_threshold ) )
  	# Take decisive action!
  	GPIO.output( _humidity_led, 1 )
	# Safe operating humidity?
	elif _humidity <= _humidity_upper_threshold and _humidity >= _humidity_lower_threshold:
  	GPIO.output( _humidity_led, 0 )
  	# Safe!

	# Temperature too high?
	if _celsius > _temperature_upper_threshold:
  	p( "[!] Temperature %.1fC/%.1fF exceeds upper threshold value of %.1fC/%.1fF" %
  	( _celsius, celsius2fahrenheit( _celsius ), _temperature_upper_threshold,
  	celsius2fahrenheit( _temperature_upper_threshold ) ) )
  	# Take decisive action!
  	GPIO.output( _temperature_led, 1 )
	# Temperature too low?
	elif _celsius < _temperature_lower_threshold:
  	p( "[!] Temperature %1.fC/%.1fF is below lower threshold value of %.1fC/%.1fF" %
  	( _celsius, celsius2fahrenheit( _celsius ), _temperature_lower_threshold,
  	celsius2fahrenheit( _temperature_lower_threshold ) ) )
  	# Take decisive action!
  	GPIO.output( _temperature_led, 1 )
	# Safe operating temperature?
	elif _celsius <= _temperature_upper_threshold and _celsius >= _temperature_lower_threshold:
  	GPIO.output( _temperature_led, 0 )
  	# Safe!

	sl eep( _poll_interval )
[ end dht22_actionable.py ]
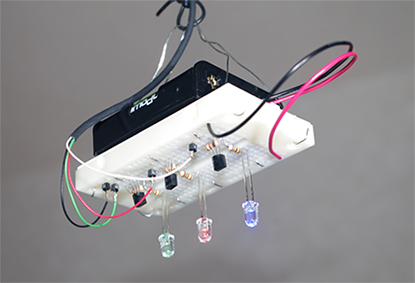
您的输出不应和下图中我的终端输出内容相同。将450C/842F的热风枪吹过一个装满水的小金属碗,以验证DHT22机房环境控制器(DCREC)已经功能正常。在您的应用中,请确保GPIO引脚连接到了一些完好的应用模块,例如MOSFET驱动继电器或双扩音器。现在开始行动吧!
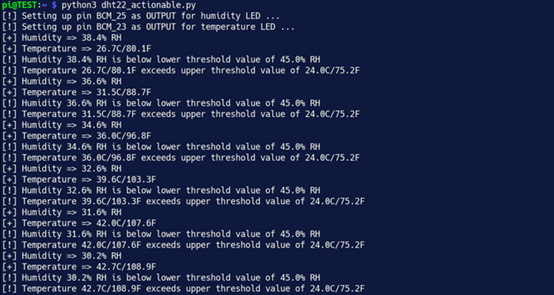
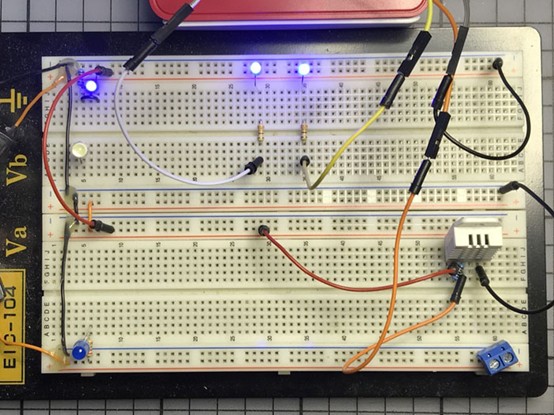
您可以在下图中看到我的面包板。在右下角,DHT22正在运行,它会以数字的形式向我的Raspberry Pi报告。在顶部中间,两个LED亮起,警告我的桌面计算环境不在最佳操作范围内。
我对此感到非常意外和震惊。

Lasse Efrayim Jespersen
Lasse出生于以色列,后移居到纬度较冷的地区。出于个人天然的兴趣爱好,他一步步走近了直接的Perl、高效的C/C++、以及优雅的MicroPython。他非常喜欢用ESP8266/ESP32/Raspberry Pi和Arduino来构建机器。